
Wall of Flesh Guide: How to Spawn, Beat & Survive Hardmode (1.4.5)
How to summon the Wall of Flesh with the Guide Voodoo Doll, its 8,000/11,200/14,280 HP, the forced-march fight, and what changes when the world turns Hardmode.
FAQ
Does killing the Wall of Flesh start Hardmode?
What happens if the Guide is dead when you throw the doll?
Can you fight the Wall of Flesh more than once?
How do you summon the Wall of Flesh?
The Wall of Flesh is summoned from the Underworld: drop a Guide Voodoo Doll into lava while the Guide is alive somewhere in the world. The doll — dropped by Voodoo Demons in the Underworld — kills the Guide instantly and the Wall spawns at the nearest horizontal edge of the map, then begins a forced march across the entire world toward the opposite edge.
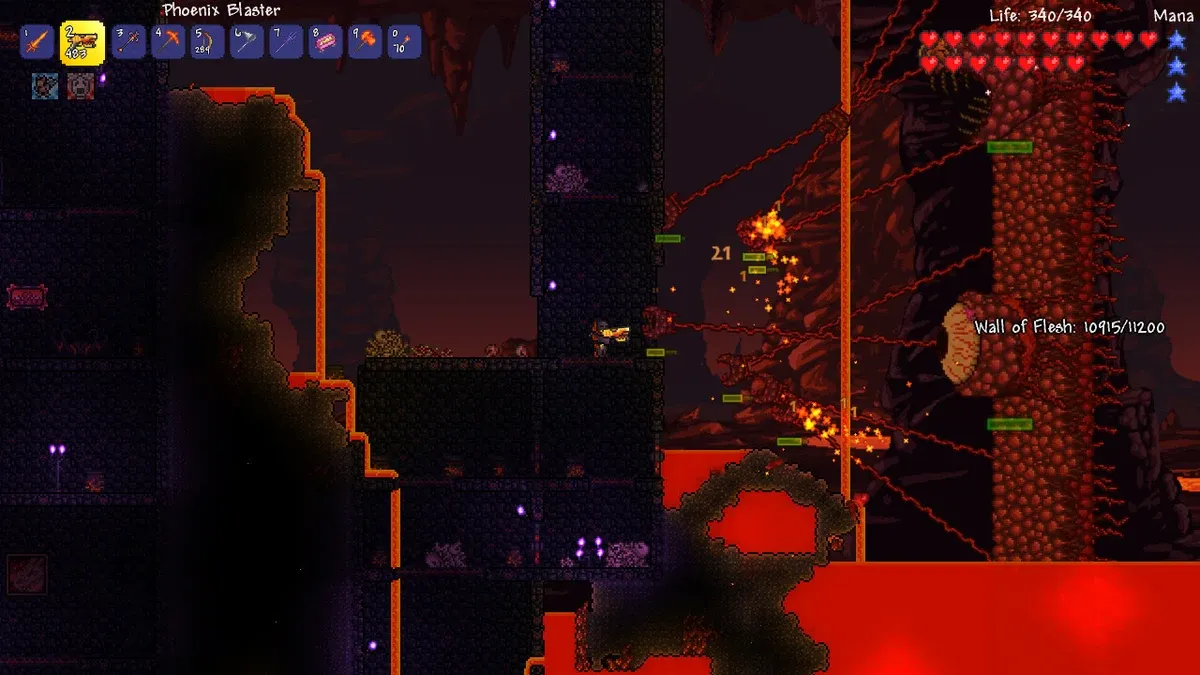
This is not a stationary arena fight. The Wall is a screen-filling strip of flesh — two eyes up top, a gnashing mouth below, and a swarm of Hungry mouths on tendrils in front — and it never stops moving. If it reaches the far edge or you die, the fight ends. If you try to escape upward or sideways past it, it drags you back with its tongue or kills you outright. The entire fight happens on the move, so a prepared runway matters more than raw stats.
What are the Wall of Flesh’s stats and attacks?
| Stat | Classic | Expert | Master |
|---|---|---|---|
| Max HP | 8,000 | 11,200 | 14,280 |
| Structure | Two eyes + mouth + Hungry tendrils | Same | Same |
The eyes are its real hitboxes — damage to the eyes drains the shared pool, while the mouth and Hungry are obstacles. Its ranged attacks are Eye Lasers that fire faster as its health falls, and in Expert/Master its movement speed scales up dramatically at low health, turning the last quarter of the fight into a sprint. The Hungry detach and fly at you once damaged, so sweeping area weapons clear the screen better than single-target pokes.
How do you actually beat it?
Build a flat ash-block runway across a long stretch of the Underworld — 500+ tiles — with campfires and sunflowers where possible; the fight is a marathon, not an arena duel. Weapon picks that repeatedly prove themselves:
- Beenades (Queen Bee drop) — the classic answer; a stack melts the mouth and Hungry line on Classic.
- Minishark / Phoenix Blaster — steady ranged DPS into the eyes.
- Starfury / melee with reach — workable but risky at close range.
- Imps and slimes via summon gear — free damage while you focus on the road.
Molten armor is the comfortable ceiling for melee/ranged; Jungle or Meteor suits serve magic. Keep an eye on the map: the Wall’s position tells you exactly how much runway you have left. If you are still gearing up, our boss order page shows what the recommended route looks like, and the class setups guide has per-class loadouts for this exact fight.
What does the Wall of Flesh drop — and what does its death trigger?
| Drop | Notes |
|---|---|
| Pwnhammer | 100% — the only pre-Hardmode hammer that breaks Demon/Crimson Altars |
| Random weapon | Breaker Blade, Clockwork Assault Rifle, Laser Rifle, or Firecracker (25% each) |
| Class emblem | One of Warrior/Ranger/Sorcerer/Summoner Emblem |
| Healing Potion ×5–15 | Always |
| WoF Mask / Trophy | 14.29% / 10% |
| Treasure Bag (Expert+) | Demon Heart 100% — a permanent sixth accessory slot, once per character |
| Relic + pet | Master mode |
Its death is the single most consequential event in a run: the world permanently converts to Hardmode — new ores tied to altar-smashing with the Pwnhammer, the Hallow biome, faster evil spread, and a global difficulty spike. Everything after this fight — Plantera, the mechanical bosses, the Moon Lord — lives on the other side of this conversion, so treat the first kill as a point of no return.
Gallery
Related Articles

Terraria Boss Order: All 33 Bosses in Progression Order (1.4.5)
The recommended Terraria boss order from King Slime to Moon Lord, with Classic/Expert/Master HP for every boss and which fights are actually optional.
Last updated Sep 27

Eye of Cthulhu Guide: Spawn Requirements, Phases & Drops (1.4.5)
How to spawn the Eye of Cthulhu, the exact natural-spawn requirements (200 HP, 11 defense, 4 town NPCs), both phases, and the full drop table.
Last updated Sep 27

Moon Lord Guide: Final Boss Stats, Summons & Luminite Drops (1.4.5)
How to summon and beat the Moon Lord — the 145,000/217,500/277,311 HP final boss — covering the Celestial Pillar chain, Celestial Sigil, and Luminite drops.
Last updated Sep 27
Was this helpful?
Thanks for the feedback!